MuleSoft Composer for Administrators and Business Analysts – Example Composer Flow Implementation
In the first part of this two-part blog series, we discussed MuleSoft Composer setup, requirements & restrictions, flow building blocks, and design checklist.
If you missed the first blog, you can find it here.
This second blog on MuleSoft Composer for Administrators and Business Analysts looks at the practical implementation of a Composer flow, that automates integrations between two systems without any code.
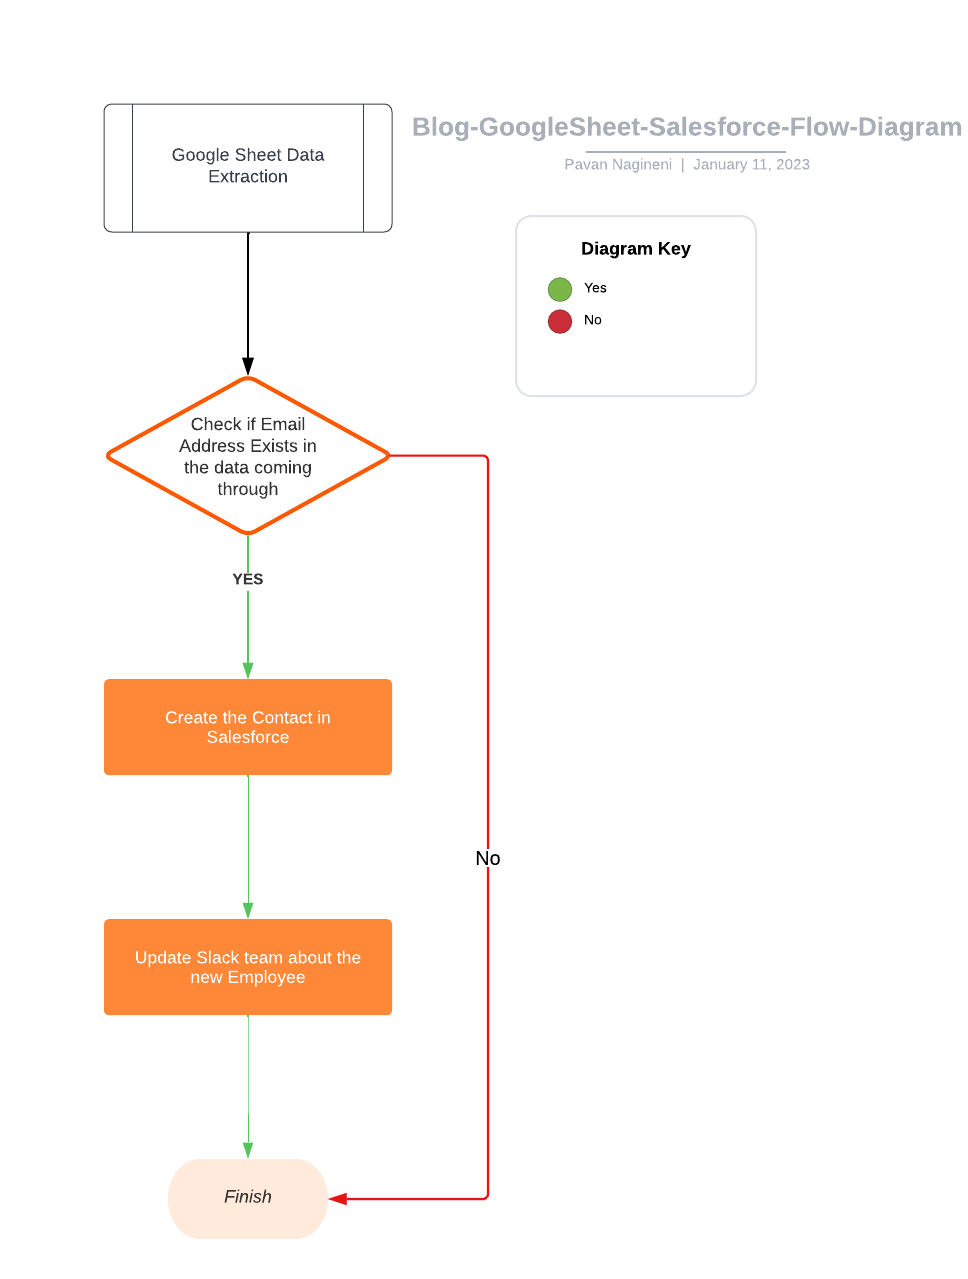
The example use case for the implementation demonstrated in this blog will be when an HR team hires an employee and need to update details in their spreadsheets. We also want to synchronize the information to the Salesforce organization (Contact object), provided the employee has an email address. Once it’s successfully sent to Salesforce, the automation will notify the MA Slack channel for team information.
Example MuleSoft Composer flow – Google Spreadsheet to Salesforce organization:
To complete this example, we will follow these steps:
- Designing the flow.
- Creating the flow.
- Testing the flow.
- Activating, monitoring, and troubleshooting the flow.
1. Designing the flow
In our first blog MuleSoft Composer for Administrators and Business Analysts, we saw that a flow is a sequence of steps that you assemble and configure to integrate systems and data. Before creating a flow, it makes sense to sketch out a flow diagram so we have a clear view of what the flow will look like at the end of implementation.
Now that we have sketched out a flow diagram for the integration, we will gather the required information about the systems to use in the flow.
| System | Required Information |
| Google Sheet | User ID and password with appropriate permissions to the account in which the spreadsheet resides. |
| Salesforce | URL of the sandbox/production org.Username/password with appropriate permissions to the org. |
Now that we have defined the required information, we can create the flow.
2. Creating the flow
To create the example flow, you need to head to https://composer.mulesoft.com/ and click create a new flow button on the top right corner of the landing page and click Create Flow from Scratch.
This will take you to the flow editing mode. First and foremost, let’s rename the flow to DEV-HR-Employee-Hire-WorkFlow-Salesforce-v1.0.0.
Now let’s follow the steps below to create the flow..
- Add a source System event by clicking the System Event and selecting Google sheet connector. In the following dialogue, add a new connection named Dev_Google_Drive_Connection and enter the Google credentials to create the connection.

- Now, select the source event as New Row, meaning the event should get triggered when a new row is created and select the spreadsheet name and worksheet name. Select the columns which we want to be populated in Salesforce.

- Next, add the + symbol and select If/Else logic to check the Email address as shown below;

- Now, in the same If logic, add the + sign and select the Salesforce connector to create the Contact. Create the connection with the Salesforce org credentials and choose to Create New Record action on the Contact object.

- Finally, we will update the same information to the Slack channel by clicking + sign and creating a Slack connection with the Slack connector. Once the authentication is complete, choose the Post message to channel action and enter the channel name and message as shown below:

3. Testing the flow
Test the flow by following the below steps:
1. Composer flow in Test mode:
Click the Test button on the top right corner while in edit mode. This will keep the flow in test mode and ready to pick any events according to the configuration.

2. Enter a record in Google sheet:

3. Perform the below checks:
- Check if a Contact got created within Salesforce.

- Secondly, check if a message for the new employee got posted in the Slack channel.

4. Activating, monitoring, and troubleshooting the flow
After testing the flow and demonstrating that it works as expected, you’re ready to activate it. Activating the flow enables it to run and perform the expected integration tasks between the source and target systems.
While on the same edit page, click on the top right corner Activate button to activate the flow.

After the flow is active, it will run in the background. MuleSoft Composer automatically handles where to deploy the flow, how to manage it, and when to scale it for optimal performance.
If there’s an error with any of the runtime instances of the flow, MuleSoft Composer will send you an email notification. You should monitor your emails for any notifications from MuleSoft Composer.
Conclusion
In this second blog on MuleSoft Composer for Administrators and Business Analysts, we have implemented an example Composer flow, covering the following steps:
- Designing the flow.
- Creating the flow.
- Testing the flow.
- Activating, monitoring, and troubleshooting the flow.
Between both blogs on MuleSoft Composer you should now have a basic understanding on how Composer could be used within your business. If you want to explore how you could use Composer within your business further, the Devoteam S Platform team is ready to assist!
So if you are planning to use MuleSoft Composer for your business or want the help of our experts for a different project, then our team is available to help. We have a range of services available that will help to grow your business.
References: MuleSoft Composer documentation – https://docs.mulesoft.com/composer/ms_composer_overview

